Cable TV analog to digital converter

From the Editor: Steve Waltke is an engineer who lives in Michigan. He enjoys do-it-yourself projects around the house. He concluded that what he learned from one of his recent activities might prove useful to others who still use rabbit ears or an antenna for television reception. This is what he says:
After doing research and setting up several digital TV conversion boxes, I thought I would share what I have learned about setting up equipment for receiving digital television broadcasts. If you currently subscribe to cable or satellite service, you don’t have immediate use for this information. However, you may want to keep it handy if you get fed up with exorbitant subscriber fees and do not want to spend at least $400 to buy a new digital TV.
If you are using rabbit ears or an exterior antenna with your TV, you may find this information essential. By federal law, starting in February 2009, all commercial television stations must stop transmitting the old-fashioned (analog) way, and must begin to broadcast using digital format, so, if you want to continue watching TV, you will have to go digital. You don’t need to be a rocket scientist to use the new digital broadcast technology; however, you will need to learn a few new things. This article explains how to go digital as inexpensively and easily as possible. Until February 2009 the federal government will give you a maximum of two free coupons, each worth $40. Each coupon can be given to a retail store as partial payment for a single digital conversion box. The price range for these conversion boxes is $50 to $80. It is important to remember that the coupon expires ninety days after it is sent to you. Also no replacement is available for lost or unused expired coupons. You may request the coupons by phoning the NTIA program at (888) 388-2009, which is part of the Federal Communications Commission, or you can fill out an online request by going to the official government Website.
If you make your request by phone, the process is completed by a relatively capable, high-quality automated voice-recognition system. At the end the system will tell you the approximate date you will receive your coupon by mail. More important, it will also give you a confirmation number. Make a note of this number in case you have a problem receiving your coupon. Don’t forget that you must use the coupon within ninety days. Anyone can purchase a digital conversion box from any store that sells electronics and TVs; you are not required to have one of the government-issued coupons in order to purchase one.
My personal recommendation of stores that are knowledgeable about what you will need and how to be successful are Best Buy and Radio Shack. Radio Shack has a wider selection of unique adaptors and cables that you may need unexpectedly. However, it is highly likely that you won’t need anything except your new conversion box unless you own a very old TV with the sets of screws to which you attached rabbit ears or an external antenna or have very old style connectors on your rabbit ears or external antenna. Note that WGBH-TV Accessible Media and Technology project has determined at this early stage that at least two brands of digital TV conversion boxes will allow you to turn the SAP (descriptive audio function) on or off simply by pressing the button labeled “CC/audio” on the remote control. Those brands are the Digital Stream, found at Radio Shack, and the Insignia brand, found at Best Buy.
Keep in mind that, when you connect your new box, you just attach it to the VHF connection on the TV because the new conversion box will be sorting out the various signals. If you are also buying a new set of rabbit ears, you will notice they look just like they have for decades, except that now they have what is called a coax-style connector instead of the little metal horseshoes.
When you open the box with your new gadget, you should find a plastic box measuring approximately ten inches by eight inches, a remote control, the quantity and size of batteries for the remote control, at least one cable with coax-style connectors on each end, and a print instruction manual.
Place the converter box on a solid, safe surface, and disconnect the rabbit ears or external antenna from the back side of your TV set. Ideally the next step is to attach the rabbit ears or antenna to the connector that is labeled “antenna input, ” located on the rear of the new converter box. That is precisely what you must accomplish; however, you may discover that you must purchase an adaptor that will enable you to connect your ears or antenna to the new box. The exact type of adapter you need will depend on the type of connector your ears or antenna have on the end of their cable as well as the type of connectors on the rear of your new box. Whatever type of adapter you need won’t cost more than $10.
The next step is to remove the new cable from the product box and attach it to the connector labeled “antenna output” on the rear of your new converter box. Then find the opposite end of this new cable and attach it to the VHF terminals on the rear of your TV set. Once again, depending on the age of your TV, you may need to use an adapter so that the different styles of connectors will make the attachment possible.
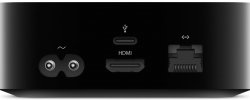
While you are investigating the rear panel of the converter box, you will notice several other connectors that are different from the antenna input and output. These connectors are not essential for digital broadcast reception. They send the TV antenna signal to VCRs, DVDs, stereo sound systems, etc.
Some people will need a sighted assistant. If all else fails, remember that the instruction manual lists customer service and technical assistance phone numbers. Perhaps the company has the manual in an alternative format as well. In any event, someone who can read the print digital menus (option selections and instructions on the TV screen) while you are setting up the new digital system must be available as you work.
The next step is to turn on the TV set’s power and then select either channel 3 or 4. Which channel is the correct one will depend on the manufacturer’s choice, and the manual will clarify this point.


